Bones and skinning - Bases |
||
When a character is finished, modeling and editing of the UV. We can even before the texture is finished (with the proviso of not improving the geometry thereafter), begin the editing and the integration of a skeleton to the character. In max this skeleton can be made up of any kind of objects, Primitives, Mesh or Poly and even splines. Nevertheless it is preferable to use objects envisaged for this purpose. With the construction of the skeleton it will be simpler and fast. This skeleton will make it possible to control the character via parameters of skinning, defining how each bone deforms parts of the body. |
||
|
|
|
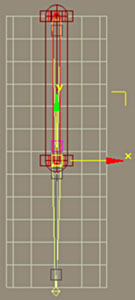
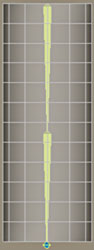
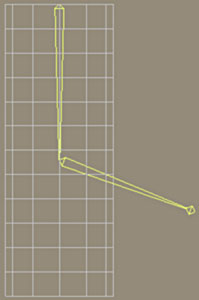
The Bones objects (Os) are in the Create panel, while clicking on the icon Systems (gears) we find the Bones button. Click on Bones then History Dependent as the type of IK Solver. Trace the chains of bones in the view Front as shown right. |
|
|
 |
|
|
Click the Modify panel. Select a bone, the root bone e.g. (the bone relative of all the others in the hierarchy of the skeleton), in general the first bone created. We can modify the thickness of the bones and the way in which it finishes, fine or broad. These adjustments are only visual and do not influence the bone behavior or skeleton. |
||
|
|
||
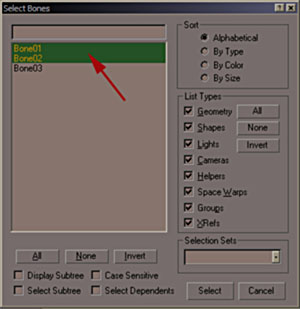
Press on H, the short cut by default will show the Select Objects. We can of course constantly re-elect the bones. |
||
 |
|
|
It is not obvious where to place chains of bones at first. Moreover to lengthen or narrow a bone it is not recommended to use the Scale function, this will not change any value and lead to problems thereafter. Maintain the joint between two bones opposite top and move this joint. We can then easily modify the shape of the chains of bones and make them coincide with the shape of leg. We can repeat the operation on each joint. To move the chains as a whole, un-tick |
|
|
 |
||
When rotating, it is better to use Local mode of the tool rotation. |
||
|
  |
|
Click on each of the bones, we can see their appropriate local axes, we can carry out the rotation still refining the bones as to match our object. |
 |
|
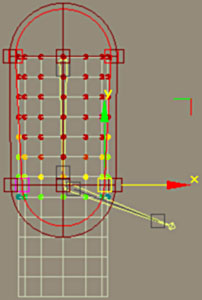
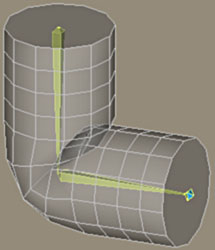
Now we will simply skin an object with a very simple skeleton. In view Face e.g., create a chain of 3 bones as we see here. Correctly position the chains on the axis of the cylinder. |
 |
|
We now will Set how each bone influence the cylinder. Select then apply a Skin modifier to it. |
|
|
 |
Activate the Animate mode and move a frame the animation bar. |
|
 |
||
 |
||
 |
 |
|
Select the cylinder, then modify the Skin Parameters click on Add Bone. In the window which appears select the two first. That makes it possible to indicate the bones that will influence the cylinder. |
||
 |
Click on Edit Envelopes, on Bone01 and in Envelope Properties, activate the Relative mode.
|
|
 |
||
|
 |
|
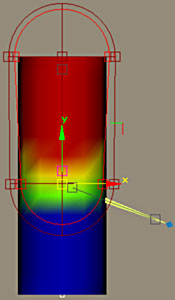
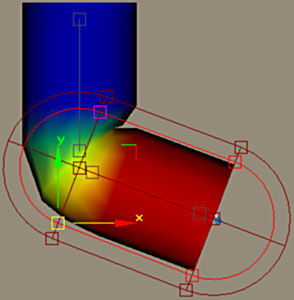
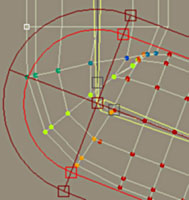
In the viewport, we see appropriate manipulators around Bone01. In 1, it is the handle we move one of the ends of the envelope (active Envelopes filter). Indeed the zone of influence of a bone can be shifted compared to the axis of the bone or even external with this one. In 2, handles regulate the 100% influence of the bone and into 3 the 0% (filter Cross Section), thus defining the volume of decreasing influence. This filter selection makes it possible to select or not these handles and thus avoid errors in handling during editing. |
||
|
||
Adjust the influence like shown above and note the colors the object takes on. The force of influence of the bone on the object, are red 100% influence and blue 0% influence. |
||
 |
 |
|
|
|
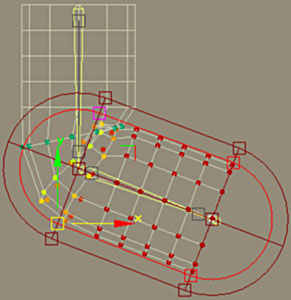
Now select Bone02, activate Relative mode and move the handles. This shows that the object is directly attracted by the bone according to its influence. This first adjustment makes it possible to make a fast but coarse skinning. |
|
|
In Filters, activate Vertices, one will refine the skinning by changing the influence with the ready vertex. Select a red vertex, in Weight Properties, value 1.0 appears. This means that the vertex is 100% influenced by Bone02, in other words, it follows perfectly all its movements, it is thus rigid. |
 |
|
 |
|
|
|
In Filters, activate that Vertices, one will refine the skinning by publishing the influence with the ready vertex. Select a red vertex, in Weight Properties, value 1.0 appears. That means that this vertex is influenced at 100% by Bone02, in other words, it follows perfectly all its movements, it is thus rigid. |
||
 |
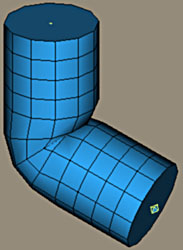
Move the animation bar a frame. |
|
|
 |
|
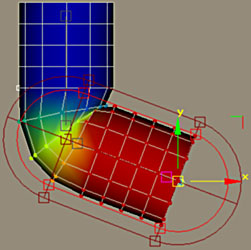
Deselect the cylinder and select Bones02, make a rotation of 45° so as to have a right angle at this time. That makes it possible for frame 0 to preserve the object as modeled. |
 |
|
With this method it relatively quickly becomes very simple to skin a whole character, by adding inflections to each frame and reviewing the skeleton. The next part it will be with the turn of Joan to receive a skeleton and to be entirely skinned. |
||